1. Login or Create an Account
Getting started with Aurora is a straightforward process, whether you’re a first-time user or returning for more insights. If you have a Google account, you can easily log in to Aurora at https://aurora.pixxel.space/ using your Google credentials, streamlining your access.
To create a new account with your email, simply enter your email address in the designated field. You’ll receive a One-Time Password (OTP) at the provided email address. Once you enter this OTP into Aurora, your account will be activated, allowing you to dive into Aurora’s comprehensive features.With your account set up, you’re ready to explore the extensive capabilities of Aurora. Start your journey into advanced geospatial analytics today.
2. Create a project
After logging in, the next step is to set up your project, which is essential for utilizing Aurora’s tools. Navigate to the Workspace settings and go to the Projects tab where you can create your own projects.
To create your project, you’ll need to input a ‘Project Title’ and a ‘Project Name (Slug)’. Note : Only numbers, letters, hyphens (-), and underscores (_) are allowed in Project Name. Spaces are not allowed.Once you’ve set up your project, you’re ready to delve into the full suite of Aurora’s functionalities. For more details about Projects, click here
3. Order Tasking Images
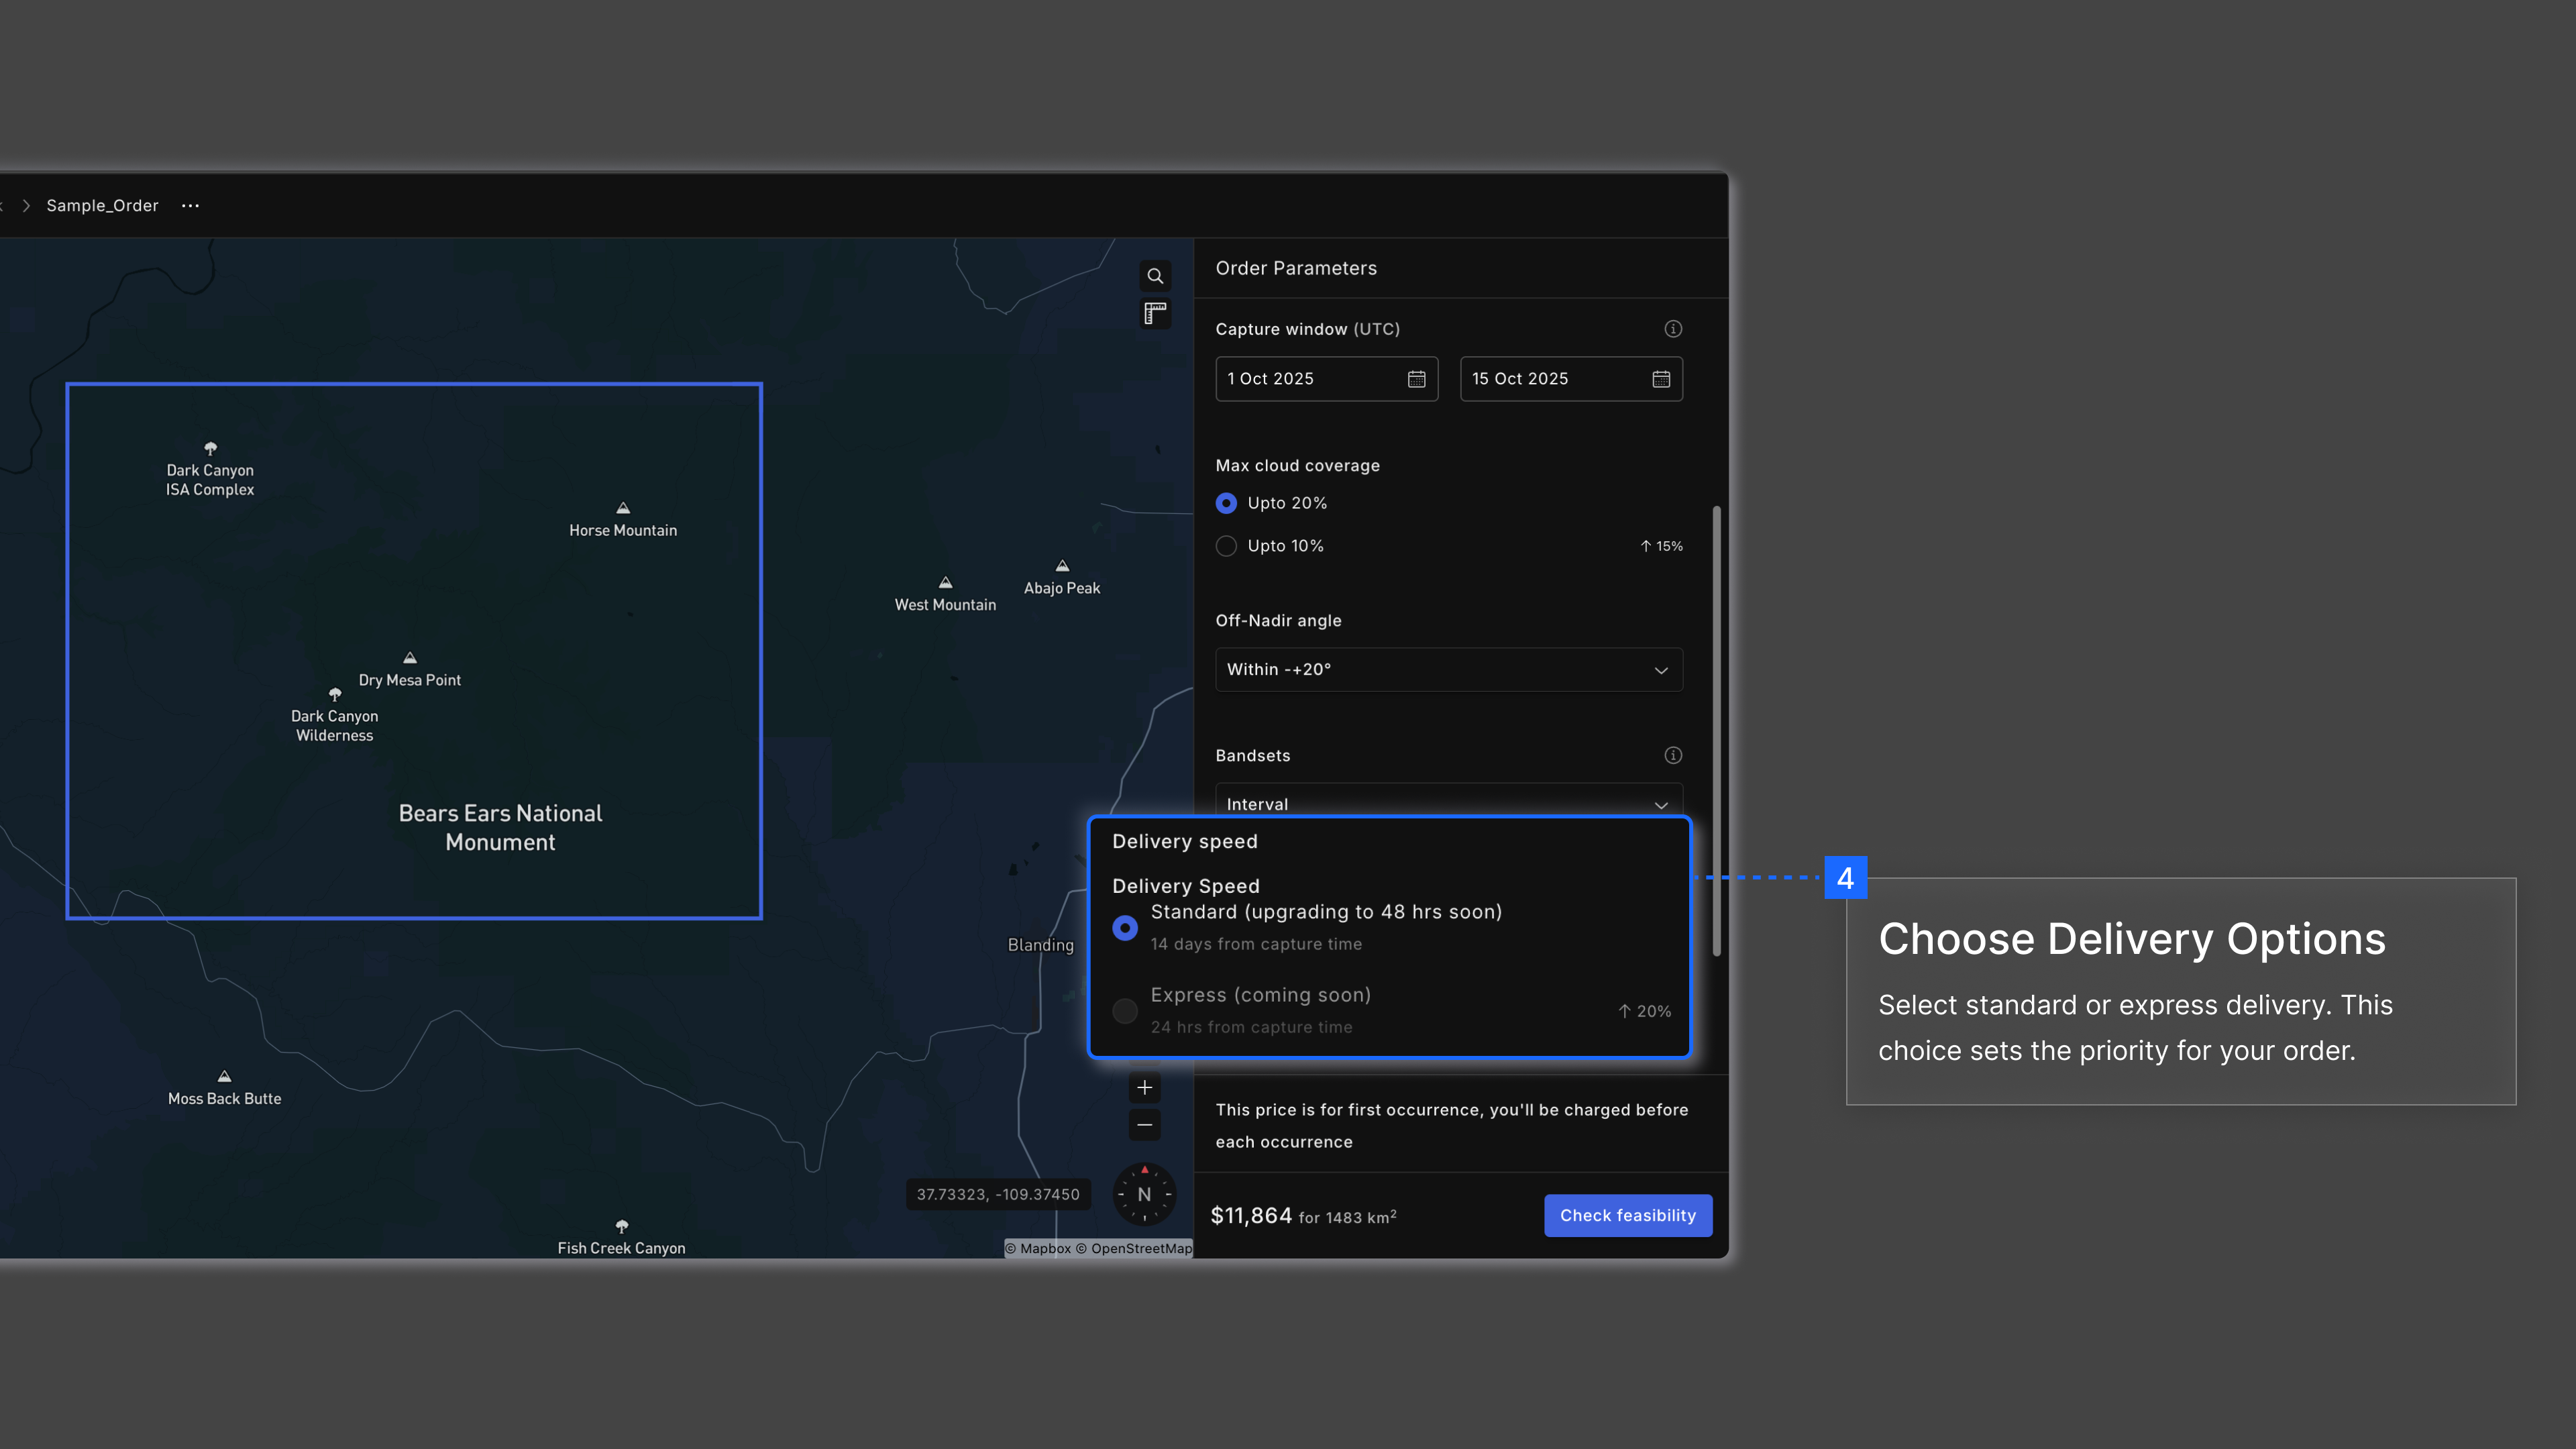
Tasking is our on-demand image capture service. Unlike browsing archived images, tasking captures are taken in real time based on your defined criteria. To order Tasking images:
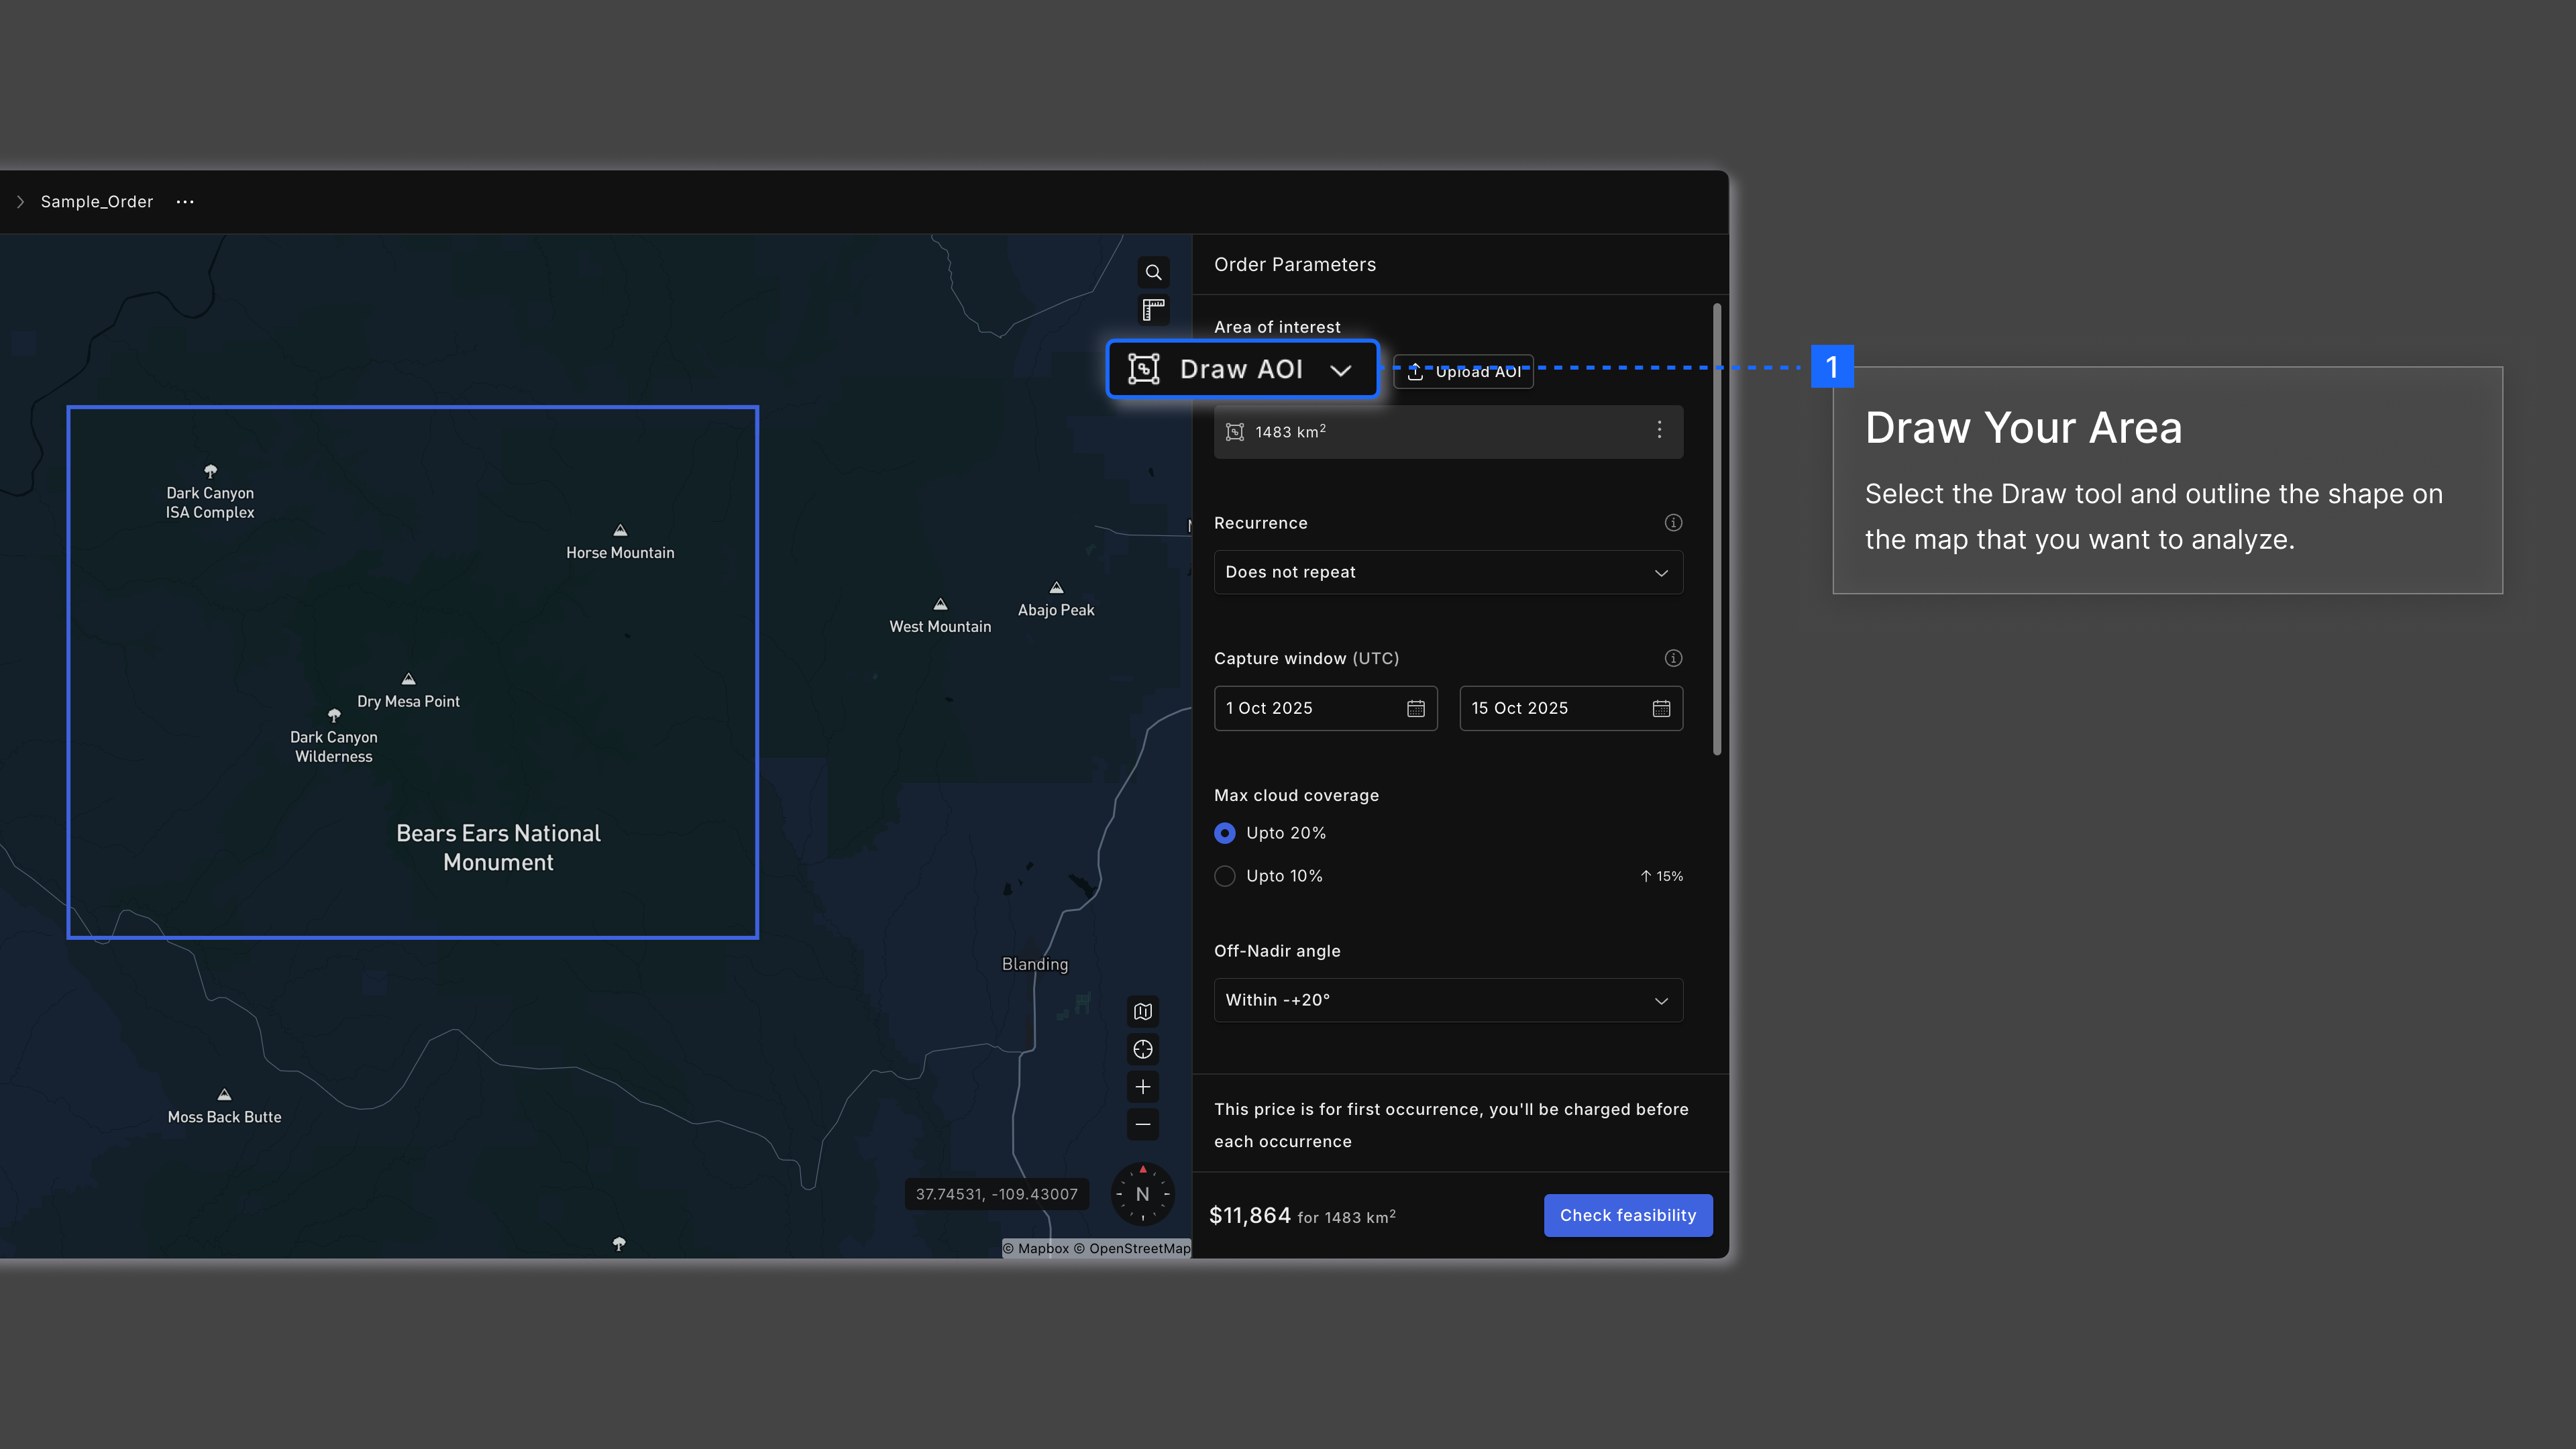
- Specify your Area of Interest (AOI):
Draw or upload the geographic area you want to image. Whether it’s a city block, an agricultural field, or an entire region, you can precisely define your Area of Interest (AOI).
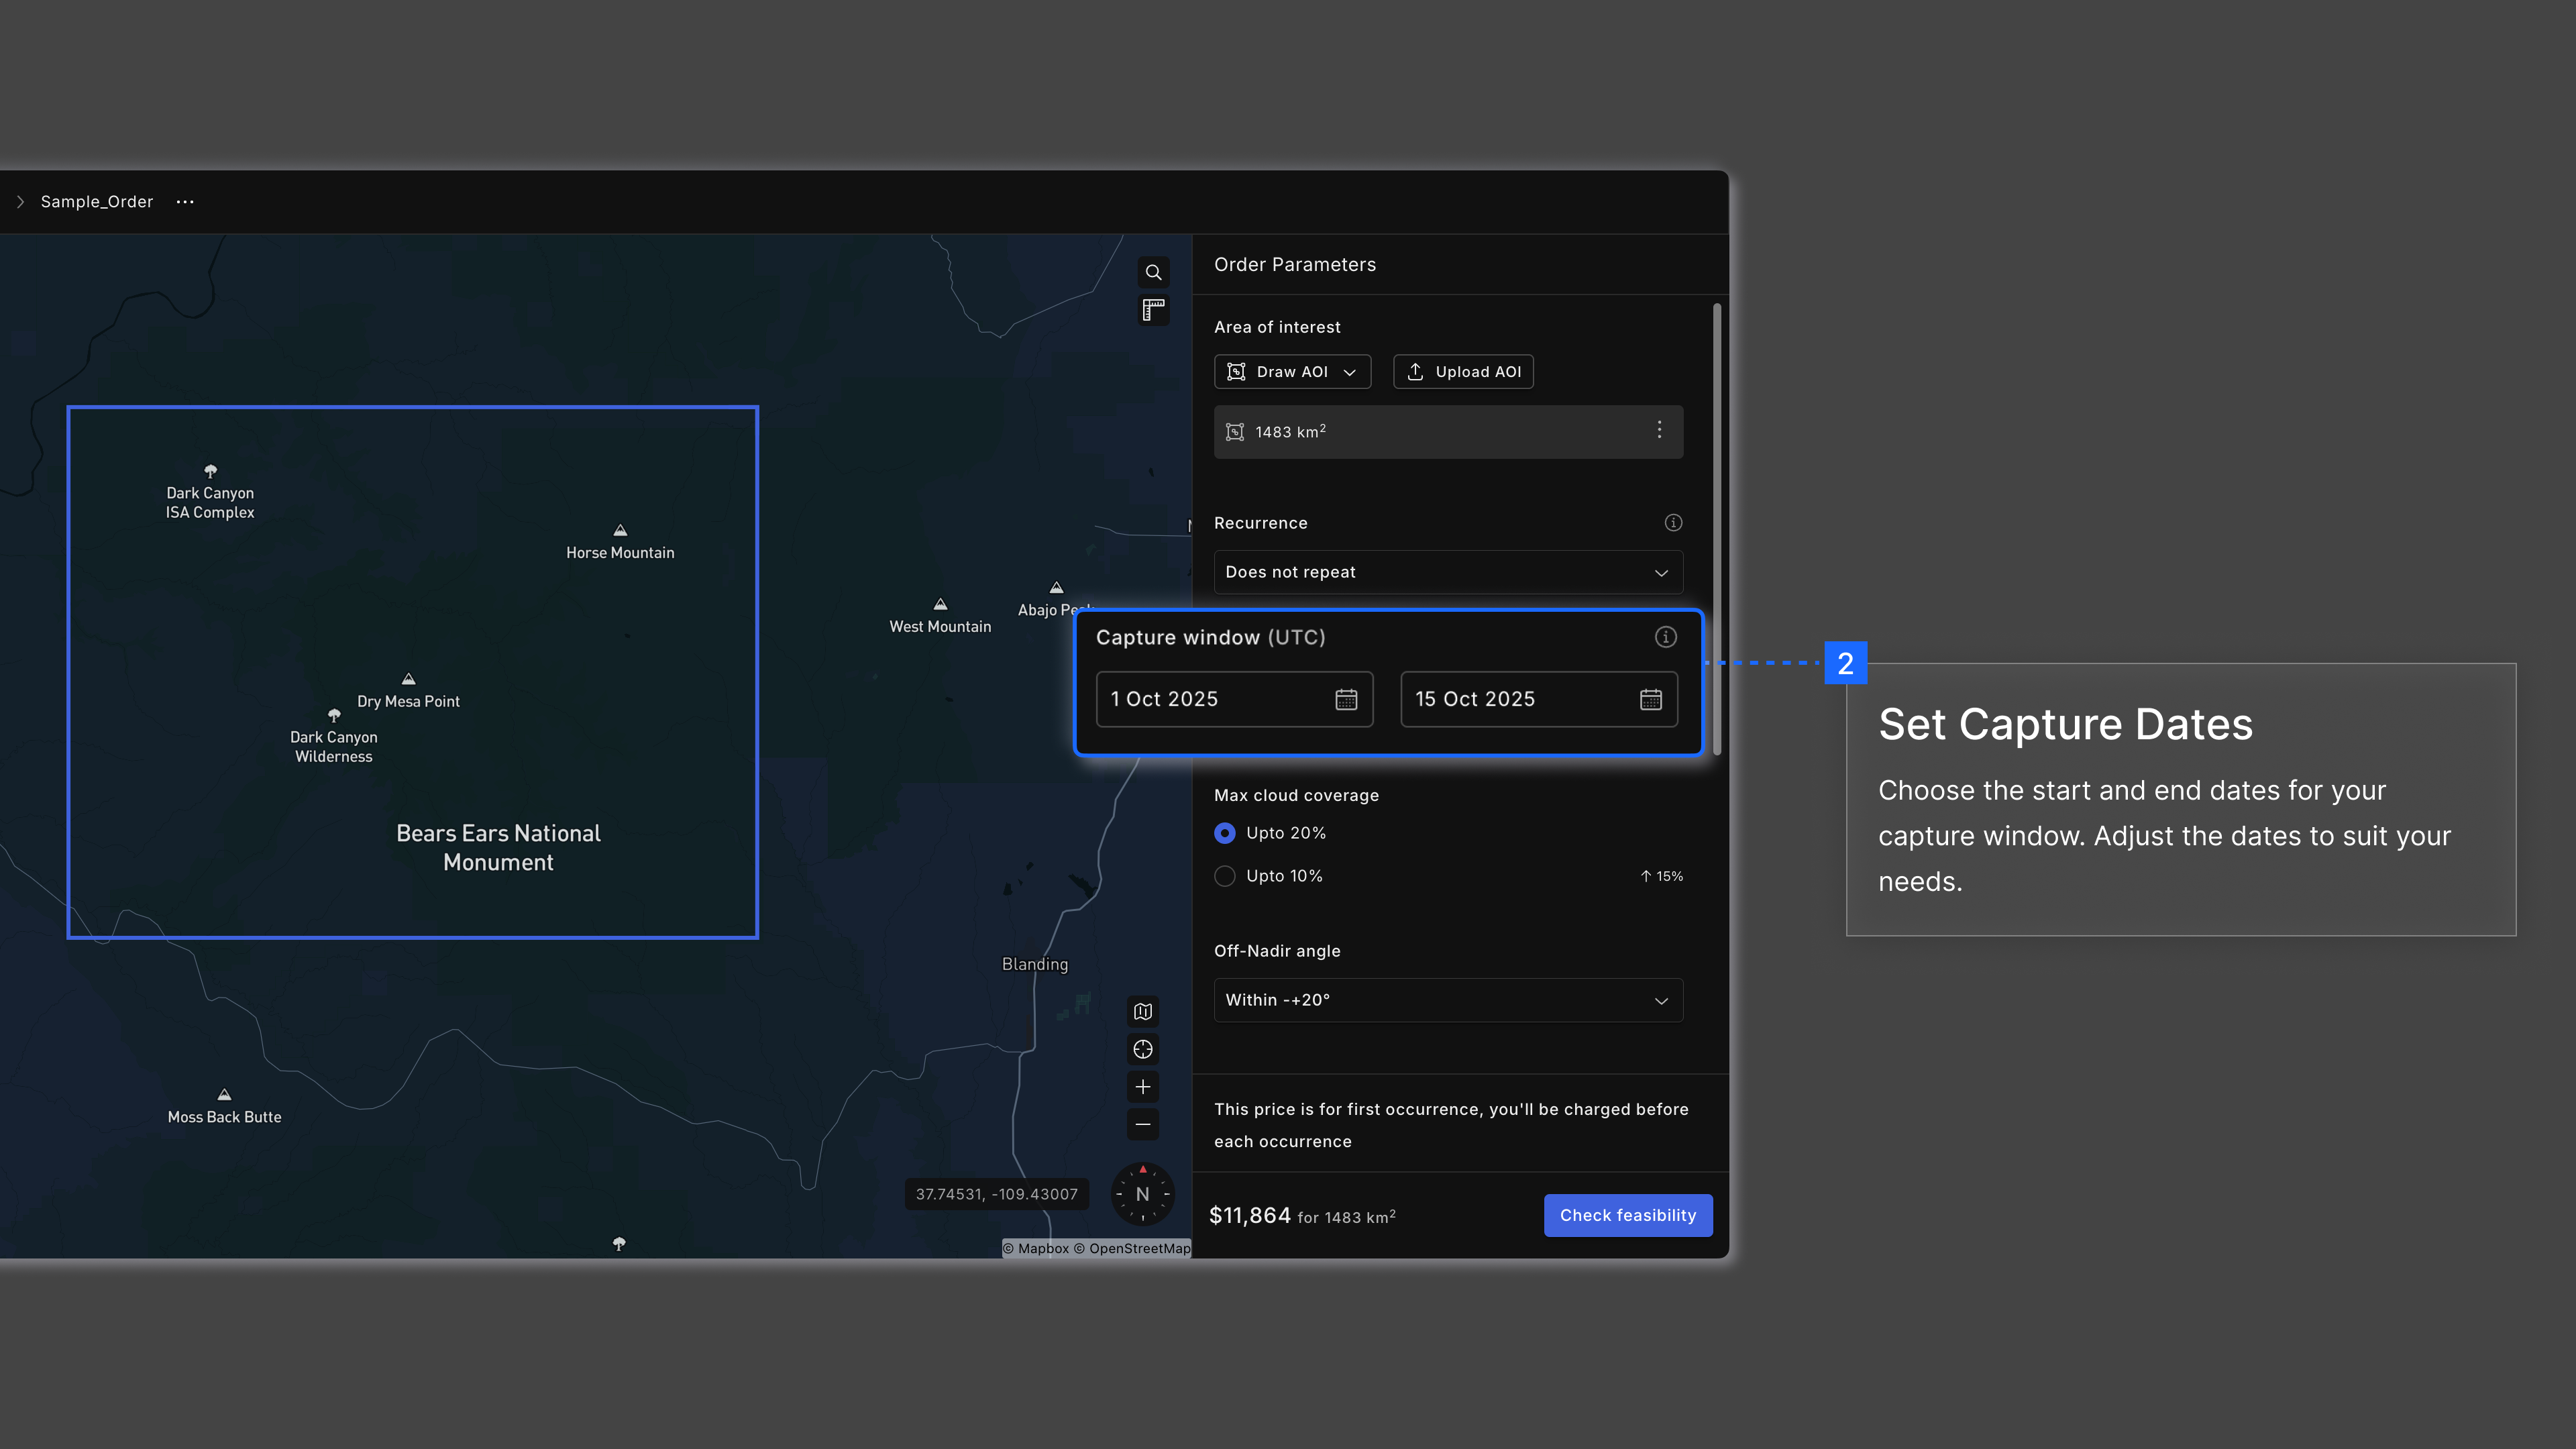
- Set a Capture Window:
Select the start and end dates for when the image should be captured. Our capture windows are flexible to suit your needs.
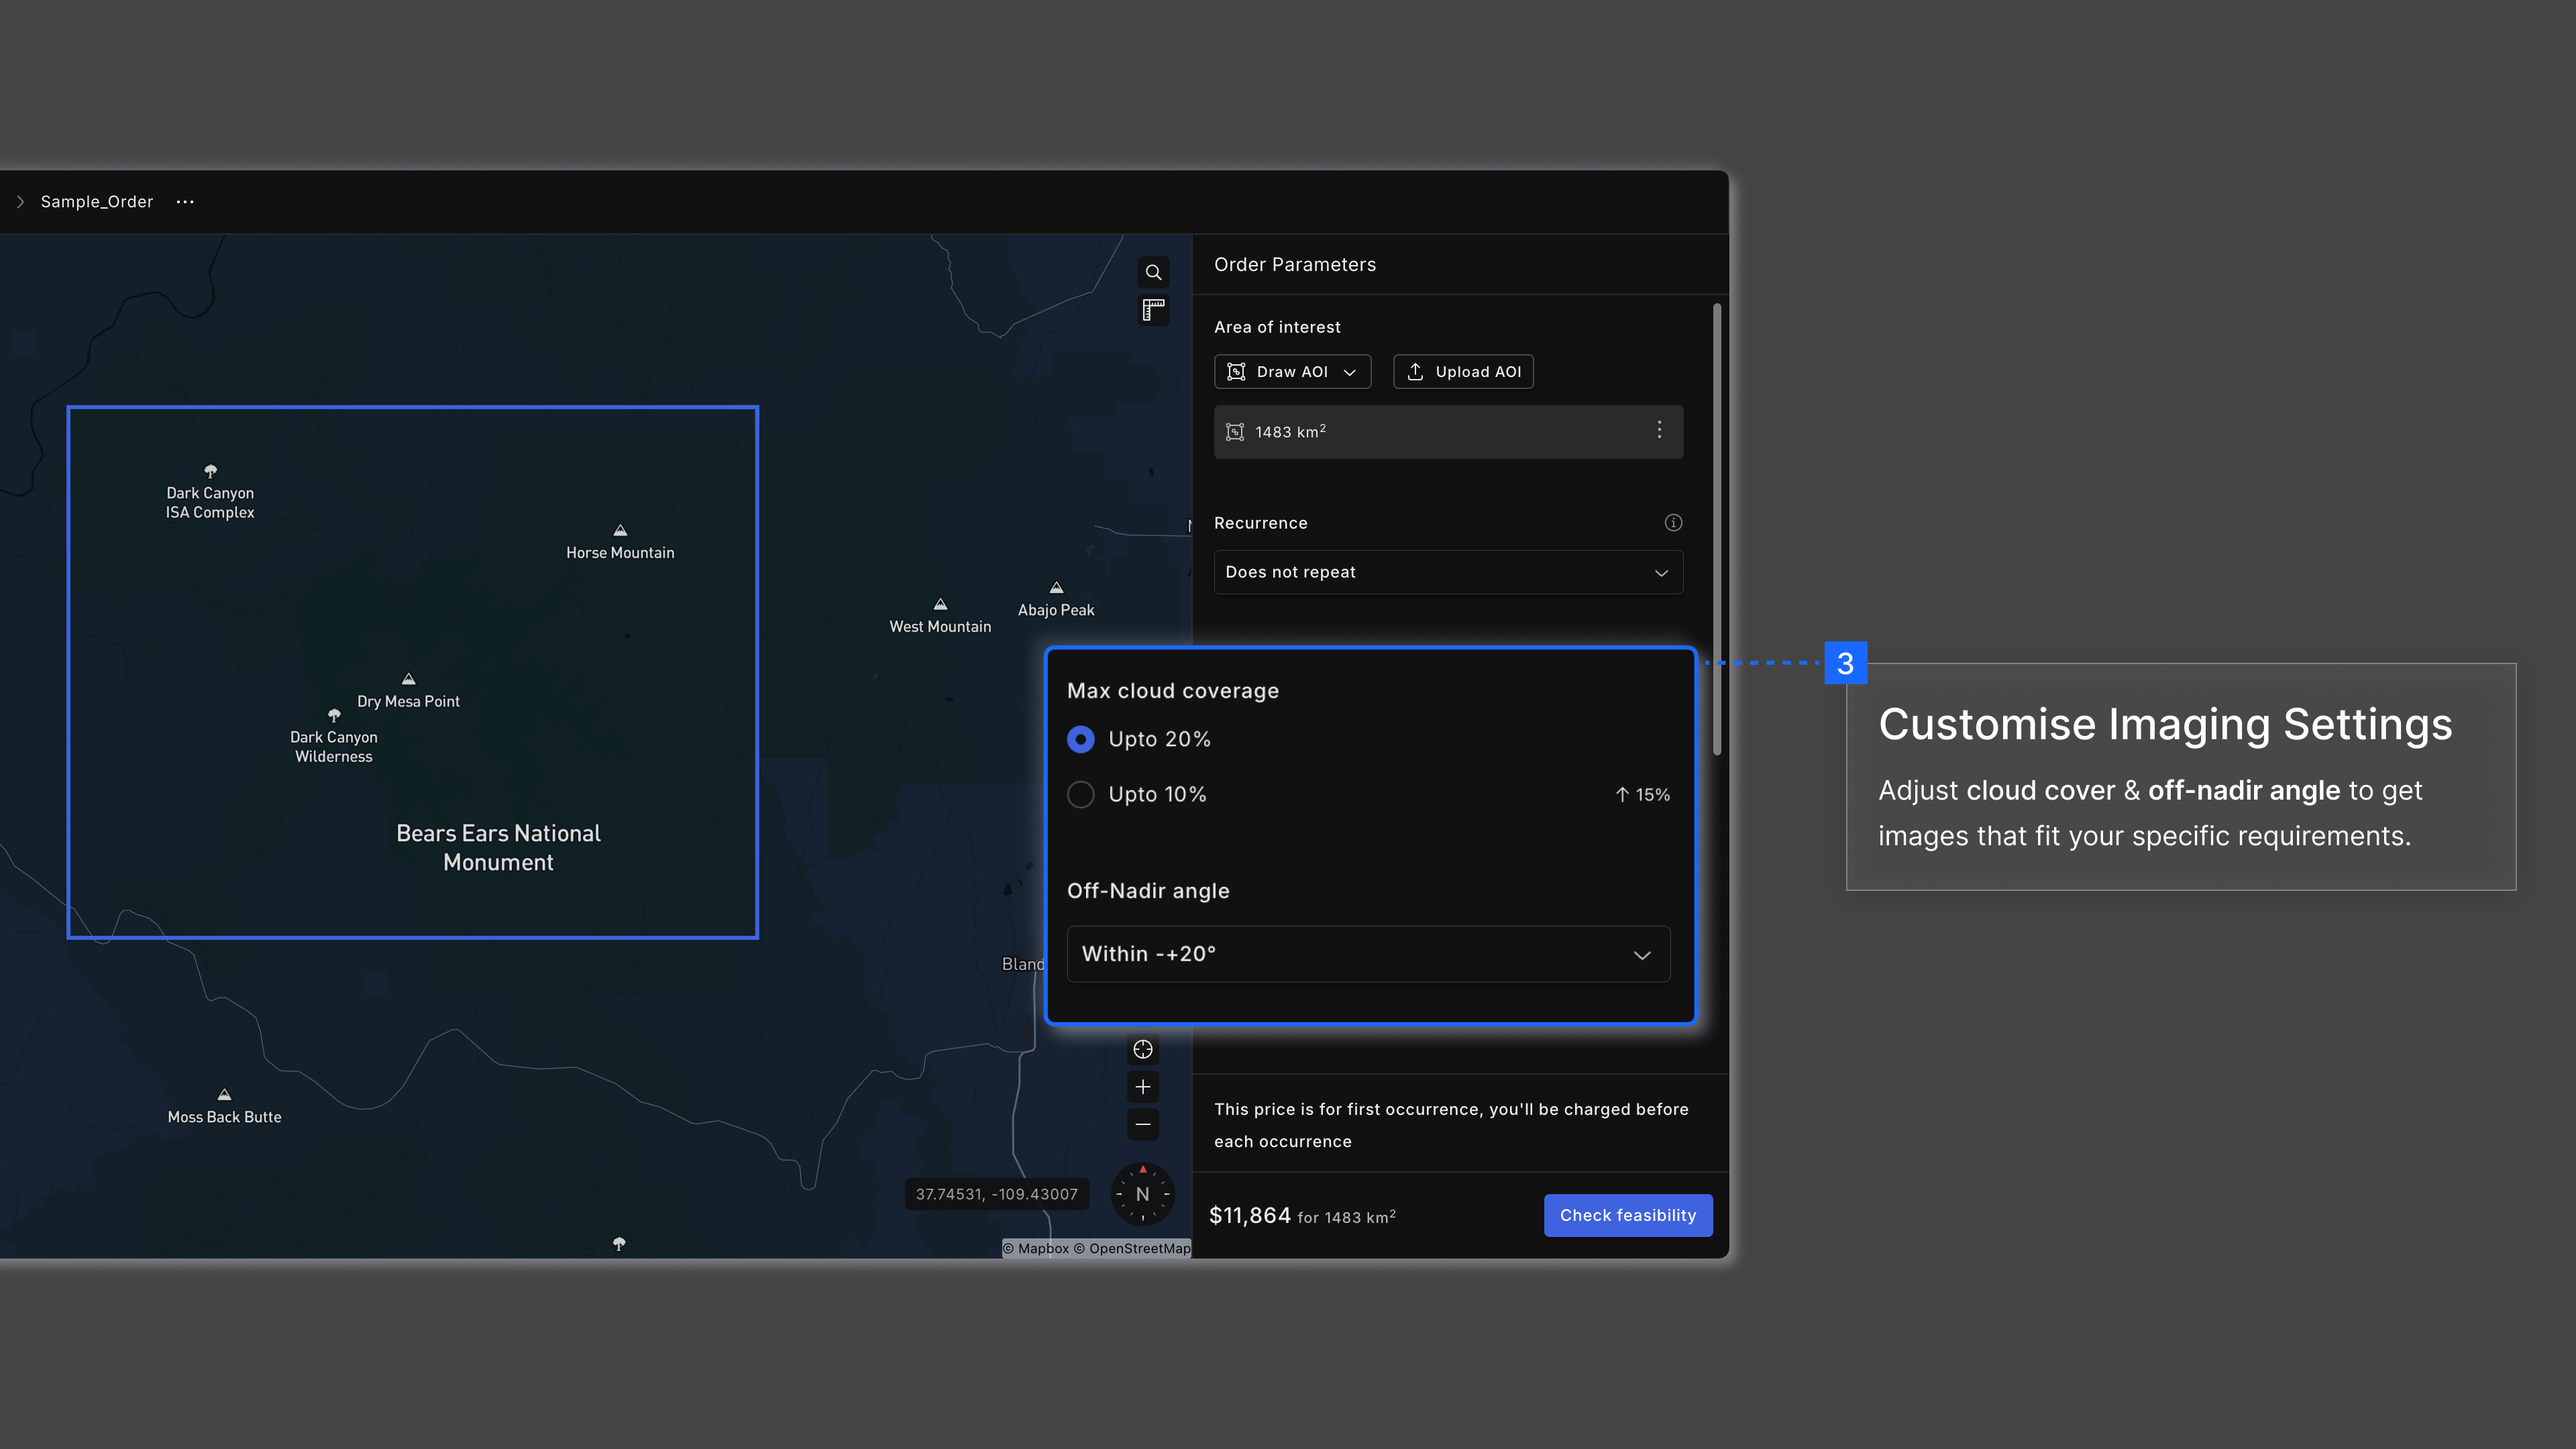
- Customize Imaging Parameters:
Fine-tune settings such as off-nadir angle, allowable cloud cover, and spectral bandset to order images that meet the requirements of your specific use case.
- Select Delivery Options:
Specify your preferred delivery timeline — standard or expedited. We’ll prioritize delivery based on your selection.
4. AOI (Area of Interest) for Analytics
Once your project is set up, your next step is to define an Area of Interest (AOI) on the Explore screen. On the Explore screen, locate four buttons on the right-hand side. Start by clicking the Search Places button to find a location of interest. You can search by name or directly input geographical coordinates and also see three of your most recent searches.
Upon locating your desired area on the map, click the Draw AOI button, then proceed to outline your Area of Interest on the map.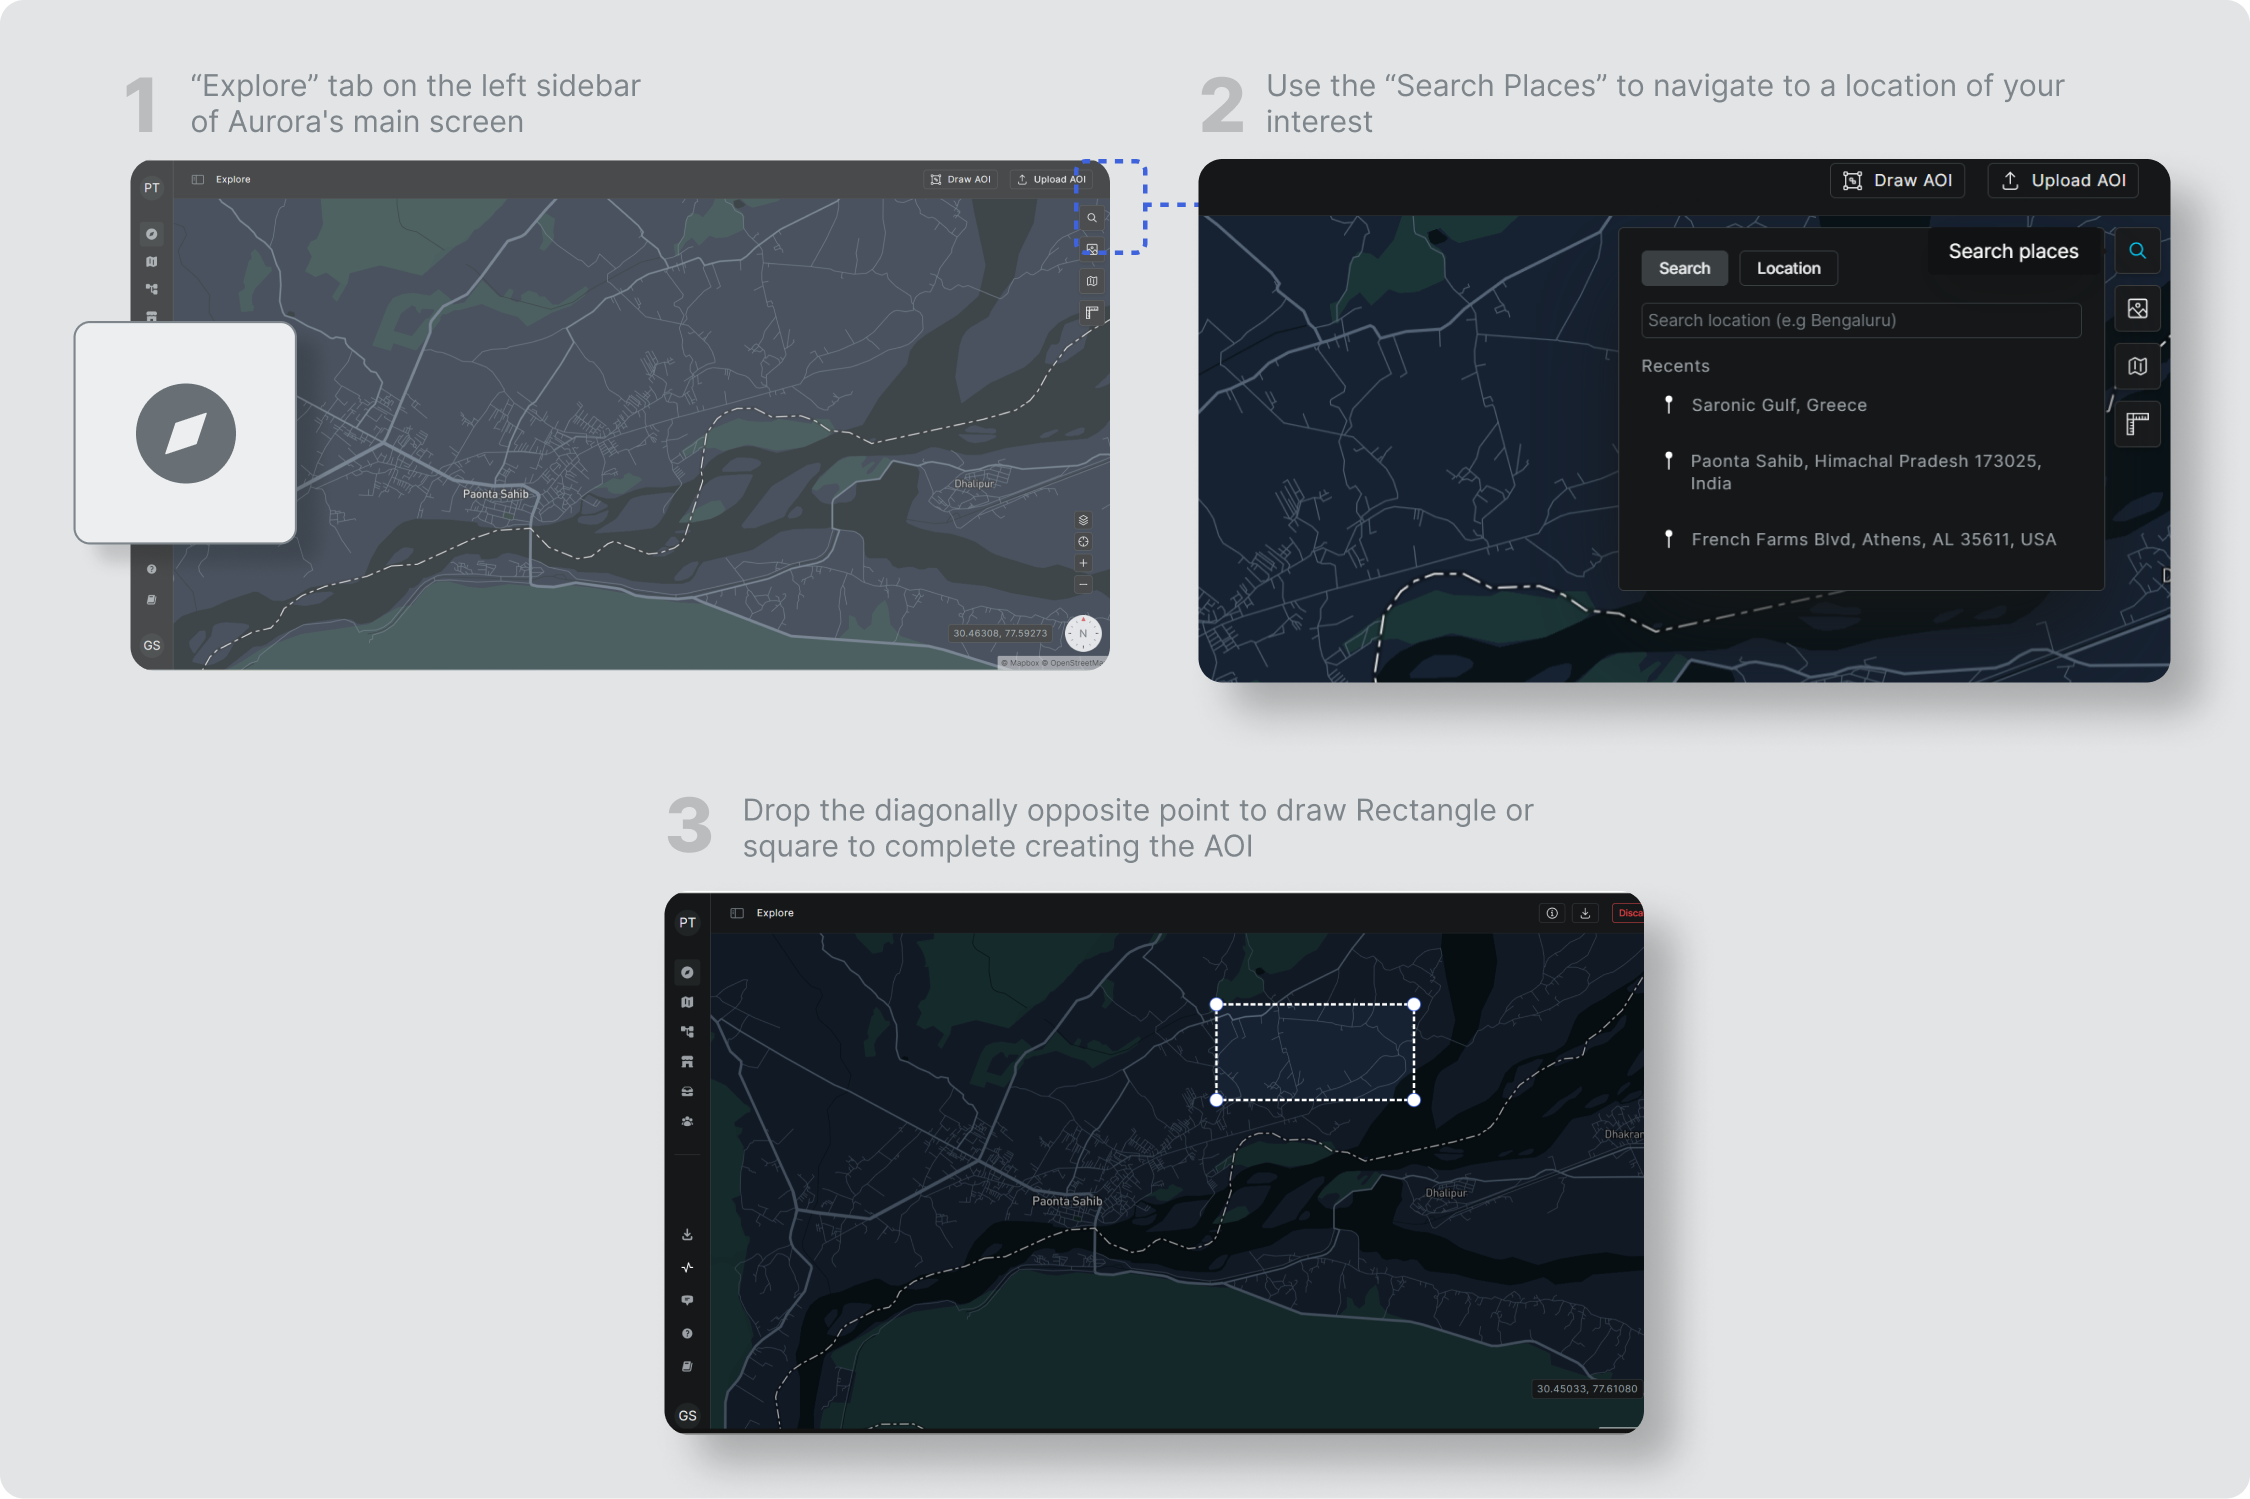
5. Select Images
After drawing the AOI, a list of images will automatically populate, or you can manually search for images using the Search Images button. Set a date range and choose your preferred constellation. Refine your search using parameters like Cloud Coverage and Off-Nadir Angle. Select the desired images from this list to finalize your AOI.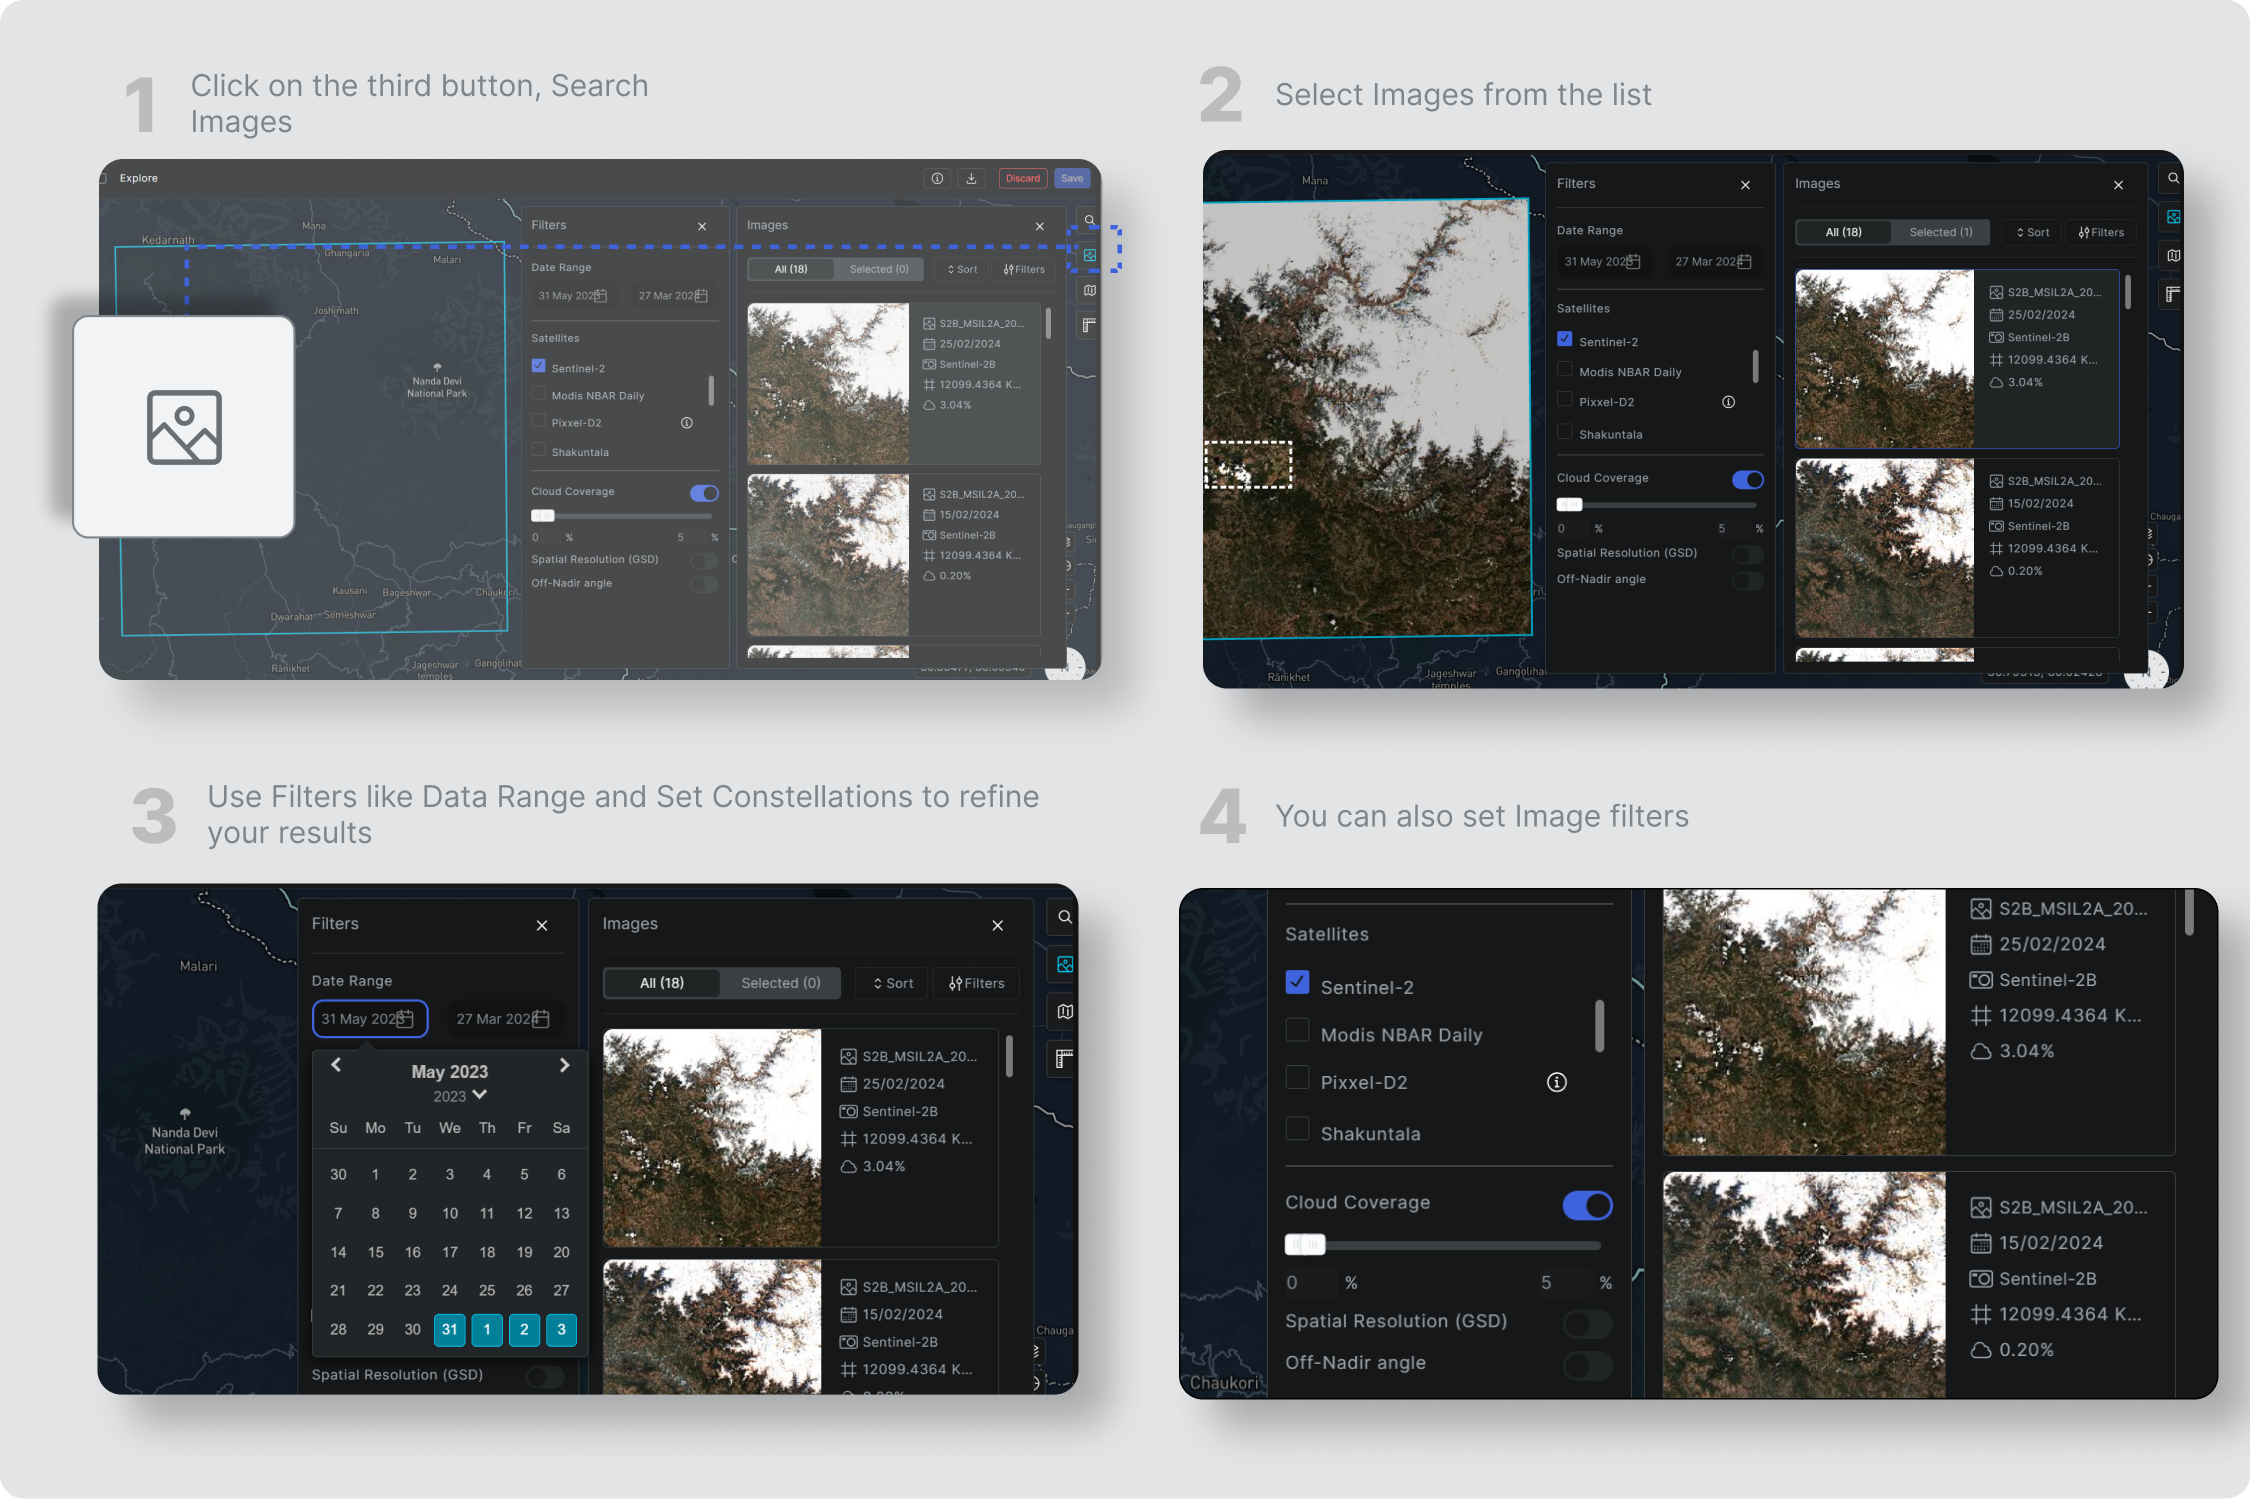
6. Analyzing the AOI
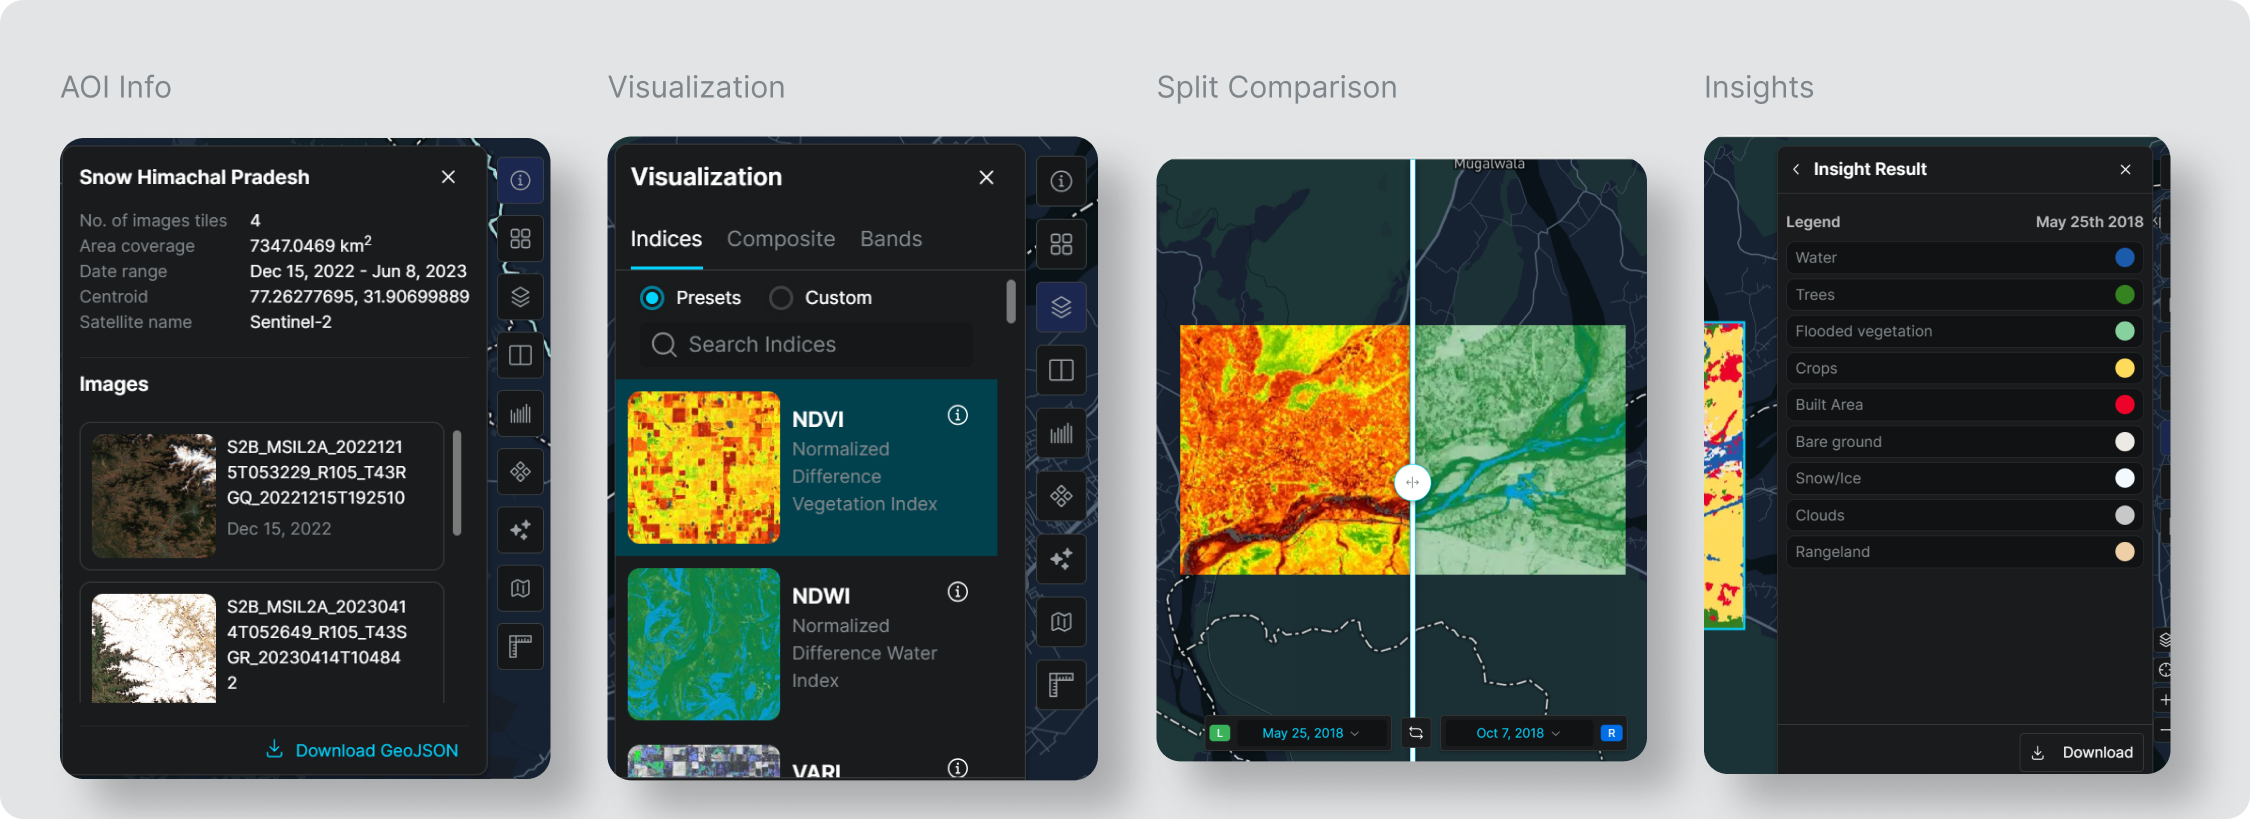
With your AOI established, various tools in Aurora facilitate its analysis. On the right-hand side, you will see different buttons. These include:- AOI Info: Details about your created AOI.
- Visualization Styles: Explore different visualization options like NDVI, NDWI VARI, etc., to examine various characteristics of the AOI.
- Split Compare: Compare two mosaics from different dates using various layers.
- Spectral Signature: Offers spectral graphs for selected points in your AOI.
- Insights: Run Aurora’s analytical models which can provide a quick and detailed analysis of your Area of Interest, like the Land Use Land Cover model, for comprehensive insights.
7. Creating a workflow
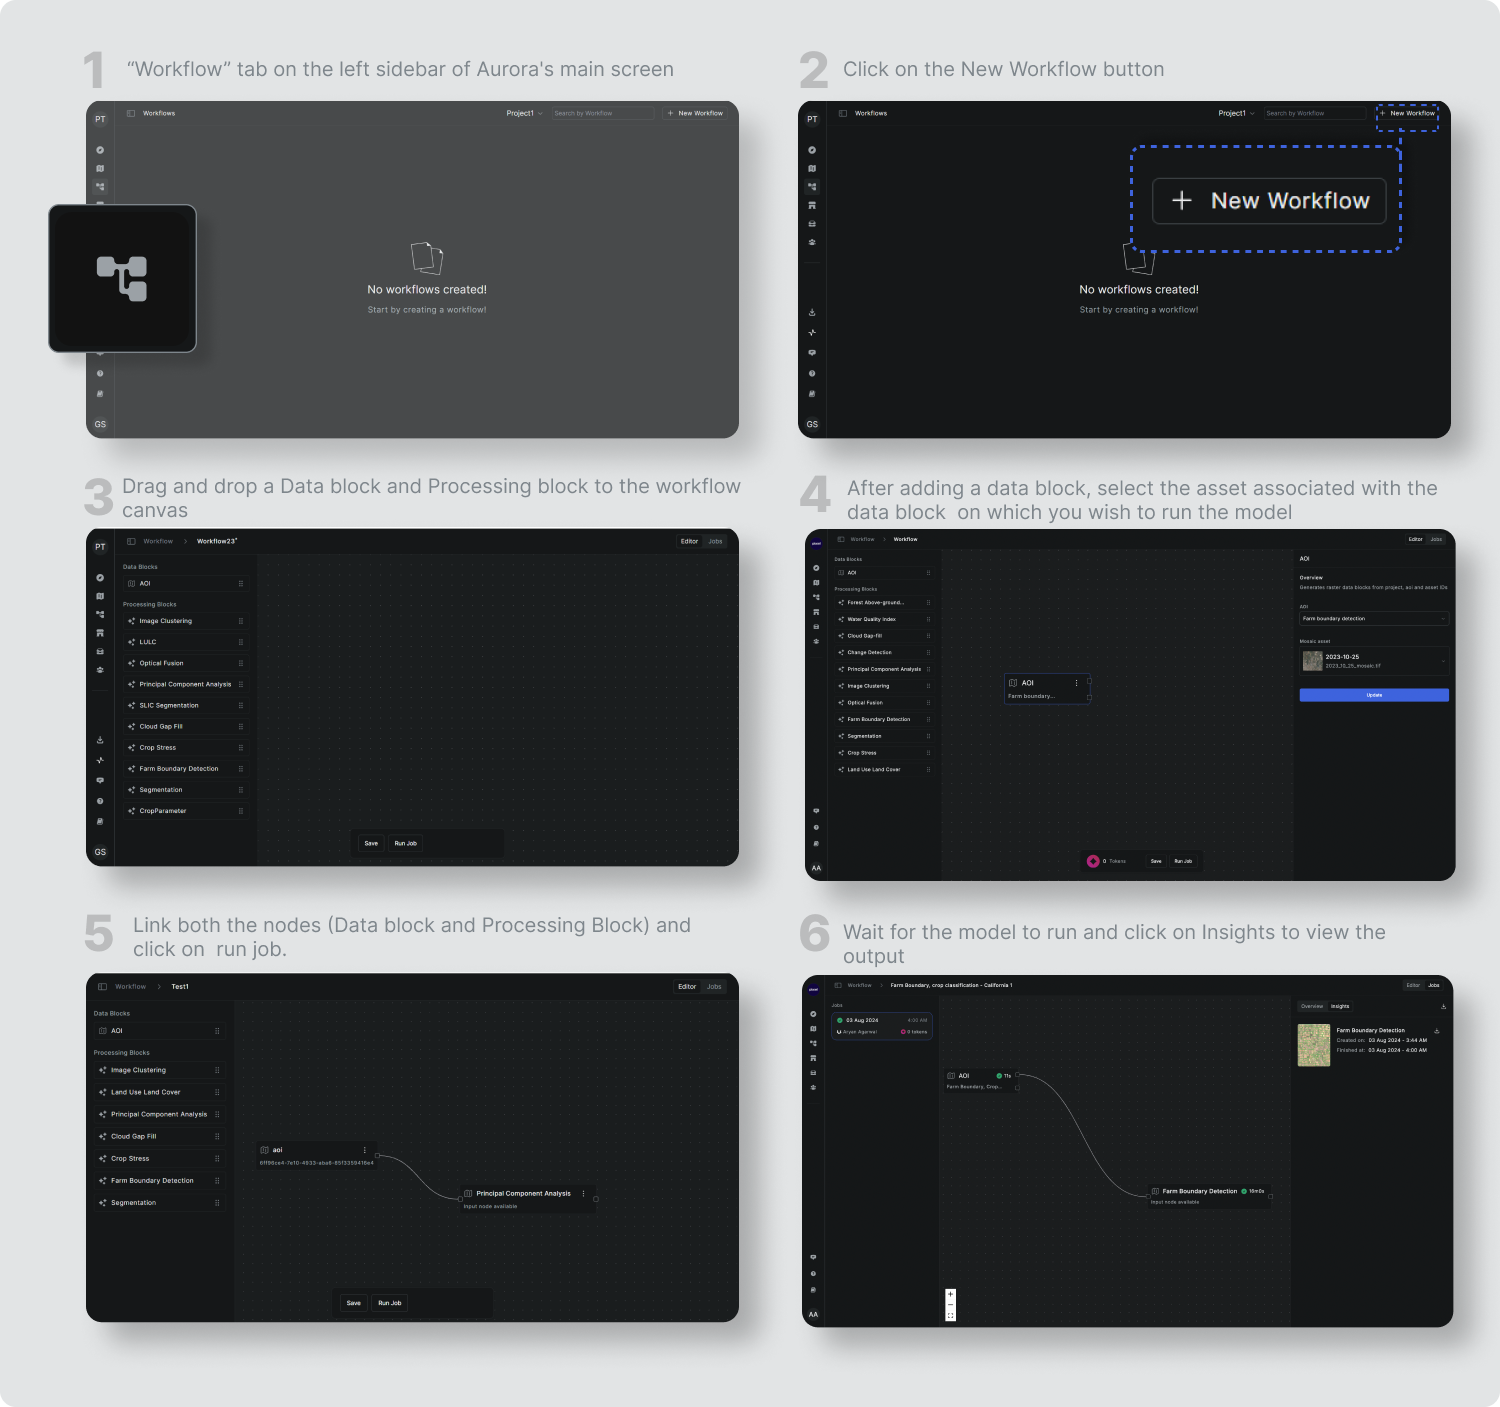
Workflows in Aurora allow you to apply Machine Learning and Statistical Models to your AOI. To create a workflow:- Select the Workflow button on the left sidebar.
- Click New Workflow button on the top right to start.
- Add a Data block on the workflow canvas, selecting an existing or new AOI, followed by a Processing Block containing your chosen models.
- Link the Data block and Processing Block to activate the Model on your AOI.
- Save and run the workflow from the bottom of the canvas.
- After the model runs, you can view the output.
8. Aurora Intelligence
Aurora Intelligence is a cutting-edge natural language interface designed to make geospatial analysis seamless and intuitive. With AI-driven automation, users can effortlessly search for imagery, generate visualizations, receive model recommendations, and streamline workflows—all through simple conversational commands.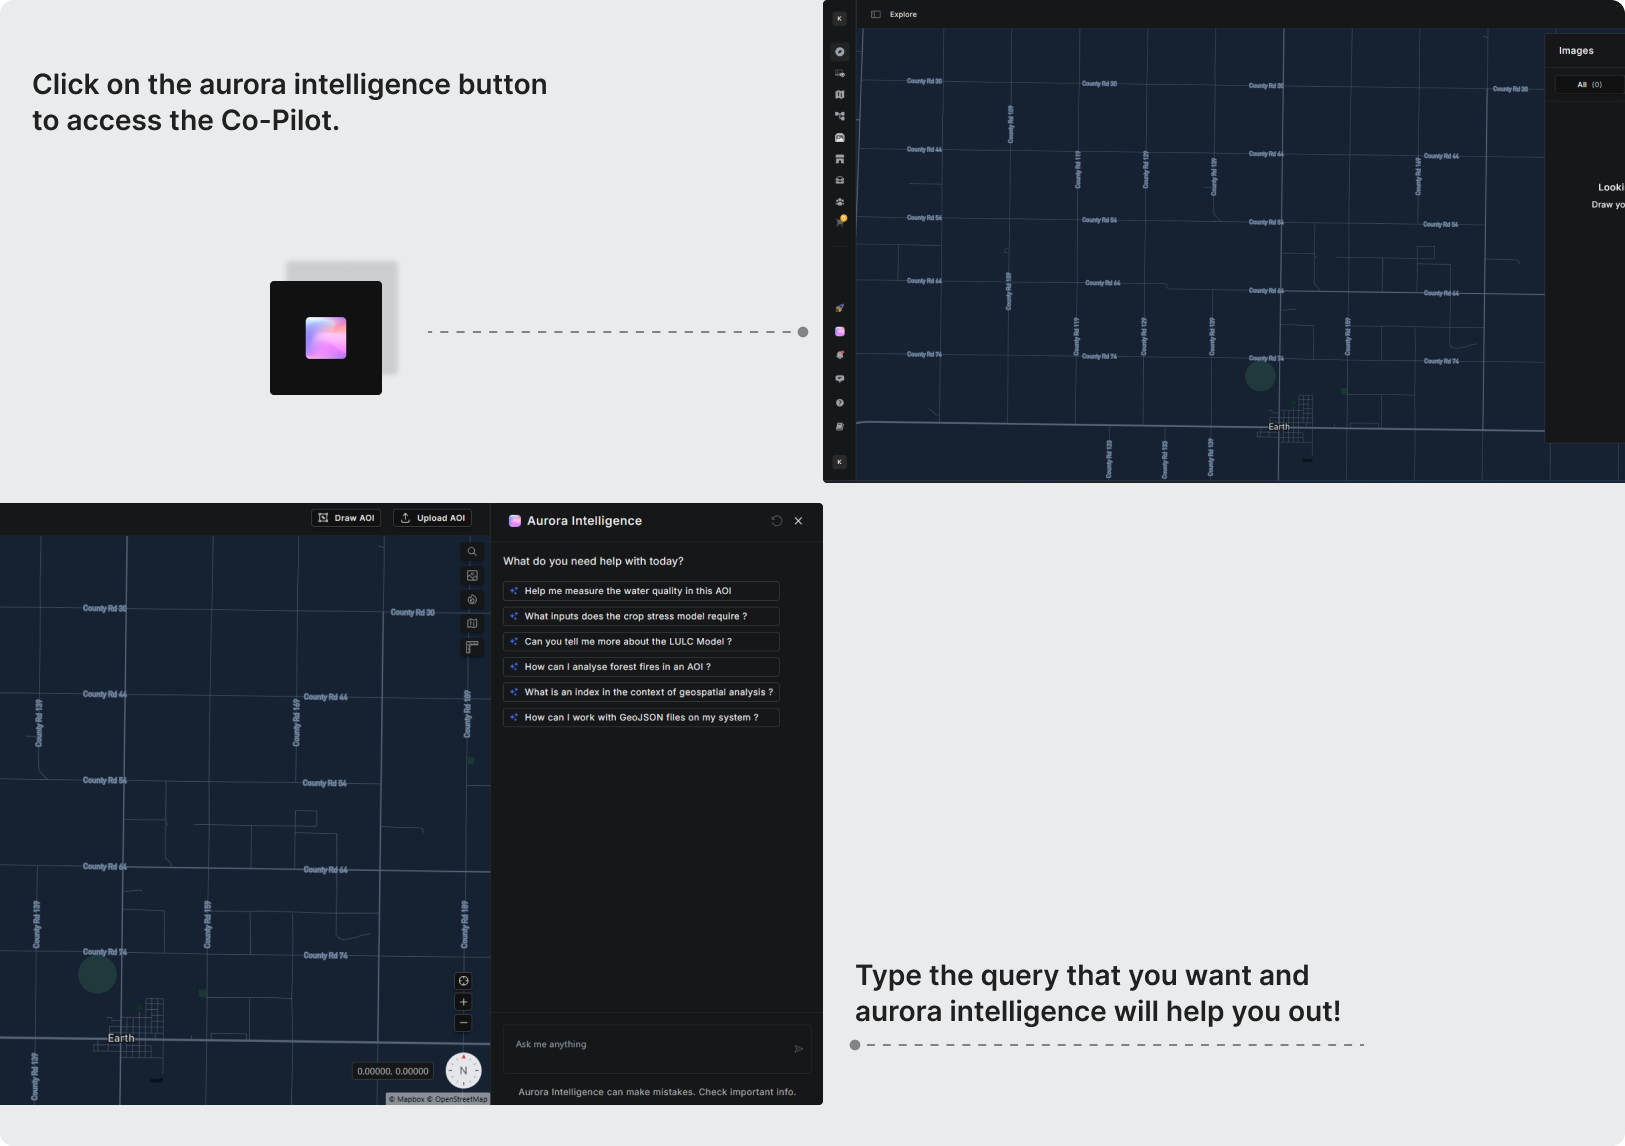
- Intelligent Image Search – No more manual searching. Just ask, and AI will retrieve the most relevant satellite imagery.
- Advanced Visualizations – Instantly generate key indices like NDVI or customize visualizations based on specific use cases.
- Model Recommendations – Get AI-powered suggestions for the most suitable analytical models tailored to your needs.
- Assisted Workflow Creation – Receive AI guidance in building workflows for streamlined image analysis.
- Guidance & FAQs – Aurora Intelligence serves as your virtual assistant, providing insights, answering queries, and simplifying navigation across the Aurora platform.